Saturday 22 December 2007

Friday 21 December 2007

Varnishing the stand

An end to sanding Zaphod's stand!

This is the stand, with four coats of French polish. I like the rich toffee colour.

You can see the stencil has been left unsanded. I now have to strip and paint the swing irons and brackets, then hurrah! it's on to the fun bit, gesso and paint for the horse.

Friday 7 December 2007

Some of my horses...

Reading to rocking horses...

I took this photo (dashing to arrange myself in the ten seconds you get) for publicity purposes. I've entered my novel Trav Zander in the Amazon Breakthrough Novel Award contest, and entrants are able to load a profile.

A sneaky way to have more than one photo in your profile is to post a photo on a book for sale on Amazon.

This is it; me reading Patricia Mullins' The Rocking Horse.

Thursday 22 November 2007

Varnishing the hoof rails

End of the sanding in sight!

I finished sanding the hoof rails and varnished them to make me feel I was getting somewhere. After advice on Rocking Horse Elite's eBay group I decided to use a shellac varnish as this is what would have been on there originally.

I used Rustin's French Polish, but painted it on instead of doing the whole French polishing bit with a rubber and linseed oil. Then I reduced the shine a little with 0000 grade wire wool. The varnish gives the wood a lovely mellow amber colour.


Saturday 10 November 2007

Tum te tum te tum...

Trying to think of something interesting to say about sanding...
The photo shows the left hoof rail, worn down by the feet of Zaphod's riders. It's much more worn than the right rail, as rocking horses, like real ones, are traditionally mounted from the left. It's why rocking horses' manes fall to the right, so they don't get in the way.

I believe most of the wear was done in Zaphod's early years, when he wasn't called Zaphod and had his original head. Children had fewer toys at the end of the nineteenth century, and no television or computers. Any child lucky enough to own a rocking horse probably played with it a lot.

Strange to think of those long-ago Victorian children.

(You can see there's still traces of the red paint. Grrr.)

Tuesday 30 October 2007

Attrition...

Sanding the hoof rails

I have a new plan; I am now spending half an hour each lunch time sanding Zaphod's stand on the balcony. Except when it's raining.

Eventually the job will be done.

You can see in the photo the one I have spent hours sanding. You can also see there's quite a lot of red bits still.

Wednesday 17 October 2007

Gordon Bennett, will it never end?

More Nitromors, wire wool, and sandpaper needed!

Sorry this blog has slowed down. It's the red paint.

I started on the hoof rails at the weekend. The wood is worn by years of use, and glutinous red paint is in every groove and cranny. I shall buy in more supplies (the guy in the local tool shop rubs his hands with glee when he sees me coming) and press on next weekend.

I'm not nearly there yet.

Sunday 7 October 2007

Still sanding...

A long job

Yesterday I spent another few hours sanding Zaphod's stand. As you can see from the photo, there's still a way to go. And I haven't even started the hoof rails.

Naturally, with a hundred and twenty year-old stand, there are plenty of dents, scratches and cracks, all of which are filled with beastly red gloss paint. This has to be removed, though the wood won't end up looking like new - I wouldn't want it to anyway!

You can also see I've been avoiding the stencil, for fear of removing it. I've had plenty of good advice from Rocking Horse Elite's eBay group. The stencils were normally (but not invariably) done in ink rather than paint, which is why the paint stripper did not lift it off. I'm anxious about tackling it; I'm going to leave it till last, then tiptoe up to it with cotton buds, Nitromors and white spirit.

Jackie Darnborough's 'twin' horse has the stencil too.

Monday 24 September 2007

More about the stencil...


From Patricia Mullins' The Rocking Horse;

'Occasionally one finds the stencilled words, "PATENTED JAN 29 1880" on the base of some swing stands, notably those of F H Ayres and G & J Lines. Usually, those who patented an invention...indicated that a product was protected by marking it with the patent number and date. (The patent was for the swing stand, invented by an American, Philip Marqua).

Patent 395 actually became void after only three years when the renewal fee was not paid. In this case any patent marking should have been discontinued after 1883, although, according to the British patent office, it is quite possible that the marking may have been used for some time after that date.

Horses bearing this patent stamp on the stand base should, therefore, date from the 1880s.'

Yes! Zaphod is 120 years old.

Apart from his head.

Saturday 22 September 2007

Stencilled stand

Now this is exciting...

This afternoon I've been stripping Zaphod's stand. Other things I should be doing, but the hell with it.

And to my great excitement, I found under layers of red, crimson and white paint, the stencilled legend PATENTED JAN 29 1880. You can click on the photo to see it better.

There's the same thing in Patricia Mullins The Rocking Horse (the rocking horse bible) on page 92; a horse she dates as 1880s - 1890s.

So Zaphod may be 120 years old. Or three quarters of him is...
* * *
For another example of a J & G Lines with a stencil, take a look at this website: The Rocking Horse Stables.

Monday 17 September 2007

Slow progress...

It's not fair! I need more hours in the day...

I've suddenly got some rush silver commisssions, and can't spare the time to work on Zaphod as much as I'd like. It's frustrating.

I haven't got his leg off yet, either.

I have started stripping the stand, and have removed the entirely pointless two wooden struts nailed on the top rail. Underneath was the original varnish finish, which I hope to be able to replicate in due course, if the wood is reasonably blemish-free.

Saturday 8 September 2007

Zaphod with his saddle-back

Zaphod, complete with his original saddle-back.

Here the horse is, far from finished but at least with all the bits attached that he should have.

I've glued on his right back leg, removed the car filler and put fillets of wood and Rustin's wood filler in the gap. I put the horse on his stand while the glue dried, with bolts through the holes, to make sure he still fits properly on it. (You can guess how I learnt to do this!) The other legs all have movement where they join on to the body, and my next job is to remove them and re-glue them one at a time.

This may be difficult. I'm going to try wiggling them, and if that doesn't work on its own, apply steam to soften the old hide glue.

It's no good leaving them loose, as they may not be strong enough, and any gesso and paint applied would crack.

Tuesday 4 September 2007

Completed slot for the saddle-back

Here is a nice sunny photograph of the finished slot, chiselled out ready to glue the saddle-back into.

Some jobs are harder than you expect, others easier. This, I am pleased to say, was one of the easier jobs.


Monday 3 September 2007

Ed Prytherick

This photo shows how I cut the 60 degree slot in Zaphod's back for the saddle back to fit into; a block cut to the right angle and sellotaped in position as a guide. The horse is roped to the workmate, as I don't have a carver's vice.

I'm proud of it, as it was my own idea, and it worked beautifully. I knew I couldn't saw it accurately freehand.

My woodworking skills are minimal, but such as they are I owe them to Ed Prytherick. He was my best friend long ago at Ravensbourne College of Art, where we were both doing the 3-dimensional design course. It was mostly boys in the class, and they'd all done woodwork and metalwork at school. Ed gave me remedial woodworking lessons for a term or two.

I did not excel as a pupil, but can remember everything he taught me. How to mark out, how to sharpen and adjust a plane blade, how to use a chisel, how to hold a saw. Thanks, Ed.

Wednesday 29 August 2007

Headless no more!

It's nice to see the horse complete with head.

I haven't quite finished carving; the top of the back is still too flat, and I have to saw a slot and glue in the saddle back. Attaching the neck to the body and shaping it was a lot more work than I'd expected, for two reasons.

First, as the top plank of the body was new, I had to carve that, instead of it pointing me in the right direction for the neck.

Then, the wood I used for the muscle blocks was The Wrong Kind of Pine. Don't know what it is, or what it should be, but definitely not this kind. It was like carving plywood, especially when I got to the end grain at the front. It took ages.

Now he is headless no more, I have called the horse Zaphod. A tribute to Douglas Adams' character Zaphod Beeblebrox, who had two heads. Okay, so he had his two heads simultaneously, and this horse has had his heads one at a time; plus this one is his third. But who's counting?

Saturday 25 August 2007

Eye sizes in J & G Lines


*
Just for Mary; pictures of my horse with 18 mm eyes, and with 20 mm.

I shall be painting the larger eyes a brighter brown before I put them in. Of course, once the horse is gessoed and painted, the eyes will look different.

For good measure, I'm putting photos of Jackie's twin horse, and a particularly nice 1890s J & G Lines, which came from either Jane or Jan's website (sorry, forgotten which).

Friday 24 August 2007

Bigger glass eyes...

Jackie Darnborough, who owns the twin to this horse, told me hers has 20mm eyes, not the 18 I'd thought looked right.

So I've enlarged the sockets, and think the bigger eyes do look better.

I have started on the neck muscles. This is rather daunting, because the top plank of the body was not original, so I have to shape that too; and there are a lot of nice curves to carve round the shoulders. And, of course, the horse has his head turned to one side like all the best rocking horses. An additional complication.

One leg is missing in this photo. Must glue it back in. Next I will attach the head and neck to the body...

Monday 20 August 2007

Glass eyes

Here are some glass rocking horse eyes; clear 'antique' ones on the left (one pair with the back painted) and amber glass ones on the right.

And a shot of Headless - must find him a name - with eyes temporarily attached with blu-tac.

It's astonishing what a difference eyes make. The horse can see where he's going, for one thing.

Friday 17 August 2007

Pause for thought

I'm stopping here for a while with the face. Looking at this photo and the one below, it doesn't appear very different, but I've removed quite a lot of wood, attempting to refine it. I have a nasty feeling the head is slightly too big.

I'm going to do a bit to the body, then come back, have another think, then join the head to the body, add the muscle blocks to the neck and finish the carving.

I have ordered several sizes of glass eyes, as I am not sure which will be right. 16mm, 18mm, 20mm. 18mm are only supplied by John and Dorothy Woods, it seems.

They are clear glass eyes with a black pupil, so you can paint the back reddish-brown. This is the type that Headless would have had.

Wednesday 15 August 2007

Ghost

Chipping away anxiously at the new head, I imagine the craftsman who carved Headless more than a hundred years ago watching me.

He's doing a bit of head shaking and eyebrow raising. After all, in the time I've taken so far, he could have carved two or three whole horses. Better.

'Get on with it, girl. And for goodness' sake, put a proper edge on those chisels!'

Bemused, but benign.

Sunday 12 August 2007

A lot of wood chips later

The face is too wide, which you can't see from this side view. I'm getting to a stage where there is still a great deal of wood to remove, but it's easy to take off too much.

I keep looking at the photos of similar horses, trying to distinguish exactly where the wood goes in and where it doesn't. My G & J Lines, Seraphine, has a quite different face.

This morning I got obsessed with getting the chin right, thinking I could work out from there.


It isn't right yet, though.

Thursday 9 August 2007

Starting to carve...

After research on the web, I've managed to get a reasonable angle and edge on my largest gouge, and have started roughing out the shape.

Anthony Dew says that 'the novice carver is likely to make either (or both) of two basic errors: carving away too much, or carving away too little.' Thanks, Anthony. Scylla and Charybdis.

And then there's the grain; I'm going along nicely, and suddenly the wood bites back, and I have to change angle. You don't get this problem with wax modelling. You can add bits on, too, with wax.

I hope this is entertaining you expert carvers out there.

Monday 6 August 2007

Blunt chisels and gouges are not good...

There will now be a pause in this blog as I try to figure out how to sharpen gouges...

Saturday 4 August 2007

Dropped by my local lutemaker's...

In the end I cracked at the prospect of spending the entire day wielding a handsaw, and rang my lutemaker friend, Stephen Gottlieb. With speed and skill he whisked off the surplus from my bit of scaffolding plank, and ran it through his planer.

Here is Headless, latest phase, and an archive shot of Stephen, as I forgot to take my camera. (He is rangey, not portly, but was wearing woolly jumpers as it was cold).

Wood for the new head and back

Stephen has cut out the head outline for me.
He had no suitable wood for the top of the body, but, in an amazing stroke of luck, I found a scaffolding plank loitering on its own across the road from my workshop, the right width and thickness. The guys refurbishing the bar opposite said I could have it.

Sawing and planing it, a job that would have taken minutes with the right machinery, took me much longer by hand. I am no woodworker.

I hope I am not turning into a Dad-in-shed.


Wednesday 1 August 2007

Mirror image horses

I have to put this on the blog. When I put one photo on top of the other on a light box, the match is very nearly exact. Carved by the same craftsman?

A very similar J & G Lines (thanks, Jackie)

This is a J & G Lines belonging to Jacqueline Darnborough, who does stunning restorations of old rocking horses.


It is about the same size as mine, and like mine it is plain carved. One advantage of a picture like this, of an overpainted horse before restoration, is that you can see the shape clearly. Once it is properly dappled, with mane and harness, it will look lovely, but you won't see its outline so much.

Thanks too to Jane Hooker, who has also sent me some very useful photos.

Tuesday 31 July 2007

Sanding off the paint and old gesso

Goodness, I'm glad that's over. (Well, the worst of it). It's done my hands no good at all, though my arm muscles are now more toned. The flat underside is the most difficult, and I always leave it till last.

The horse had been painted twice, over patchy remnants of gesso; first in cream, then white. The back legs were reinforced with metal plates held on by twelve screws. One crack was filled with car filler. One back leg has come off, and the other is wobbly.

I pulled out nails as I went. One turned out to be not a nail, but half a drill bit, snapped off and left in the hole. This horse was made with superb craftsmanship, and 'done up' with hamfisted ignorance, the lot of so many rocking horses.

Monday 30 July 2007

Let's do up the old rocking horse!

HINTS FOR DAD-IN-SHED RESTORATION

  1. All the materials needed to restore a rocking horse may be found in any garden shed or garage.
  2. Quick tip: a power sander will whisk off that old paint finish in a trice.
  3. Always use the longest nails and screws available.
  4. Lots of them, don't stint yourself. It's fun, banging in nails.
  5. Wobbly legs? Safety is paramount. Brace them with steel brackets (available from your local ironmonger). No-one will notice.
  6. Keep a tub of car filler by you for those pesky gaps.
  7. Dapples can be tricky; why not try a fresh white gloss coat with attractive black patches instead?
  8. Be creative when replacing old horsehair. An old mop makes a very acceptable mane and tail, you will find. And don't forget, nice long nails to secure it.
  9. A saddle and bridle can be readily improvised, with a little imagination. Use what you have to hand.
  10. Now doesn't that look nice? The old horse has a new lease of life. A weekend well spent.

Sunday 29 July 2007

A paper head for starters...

My lutemaker friend, Stephen Gottlieb, (see his website, Lutemaker) is going to cut me up some wood for my headless horse's head. I have been working out the dimensions, using a photo of a rather nice J & G Lines horse of similar age.

This photo shows a paper cutout stuck on the horse to give an idea of how it will look. I have tried various increments of size. I think this is it.

I am going to use lime, instead of the pine it was. This has the advantage of showing that it is a later addition, should anyone not realize...

I have the original wooden back to the saddle which I will replace.

(Tell me if you think this head outline looks wrong. I would welcome second opinions).

Friday 27 July 2007

My only experience of wood carving so far


This is Seraphine (the eagle-eyed among you may notice she shares this name with my fictional dragon in Trav Zander).

She is a G & J Lines, and had no lower jaw when I bought her. I have replaced it, and re-tipped her ears.

A whole head and neck is more ambitious.

Tuesday 24 July 2007

Inside the belly of the horse...


It's always fascinating to open up a rocking horse and see what's inside. Children post small objects into the hollow body of the horse through the tail hole, once the tail comes out, or through the pommel holes on older horses.

Here are the interesting things out of this horse. The date on the bus ticket is 10th November, 1962. The scrap of mane shows the horse had chestnut horsehair, and the original plug to hold the tail in is here to be re-used in due course.

That's better...

I have removed all the non-original parts (except two struts on the top of the stand which will come off later). This is what is left. Paint stripping next.

Normally the first thing I do is name the horse, because you do talk to them while working on them over long months. But I find you can't name a headless horse. It's not possible to gauge its personality minus a head.

Note the beautifully shaped fetlocks, a feature of J & G Lines horses.

Monday 23 July 2007

My latest horse


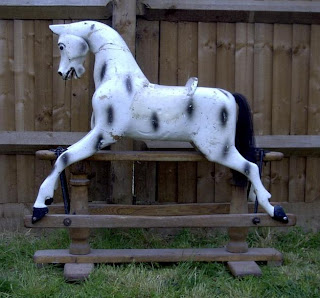
I have just collected this rocking horse, bought on eBay for £67.
.
Three-quarters of her is a hundred years or so old; the head is a replacement, and bears no resemblance to the finely-carved head she would have started out with. The top plank of her body is not original, either.

She was made by J & G Lines (you can tell by the stamp on the underside of the brackets) so I shall study photos of similar horses to see what the missing parts should look like.

I plan to carve her a new head, as authentically as possible.