Sunday 25 November 2018

Seraphine finished and for sale

I haven't detailed the stages of restoring Seraphine, as the process is the same as I used for Zaphod - even though every horse presents its own challenges. She is now finished and sold.

Here are her before and after photos:


Saturday 10 November 2018

Gesso

I used to be good at gesso - I've successfully gessoed two medium sized horses and a push horse, but found I'd forgotten the details of how to mix it. I knew from this blog that Anthony Dew's recipe is too watery, and needs lots more whiting than he says. The first coat I did was a bit too thick, and I had to do a lot of sanding - very dusty and I had to wear a mask.

Also, stains appeared, and on Seraphine's neck, this odd crack. I'd filled and sanded the wood carefully, and have no idea what caused this problem. I had nothing like this with Woot or Zaphod (but I guess many things can happen to a horse in more than a century). Gesso is supposed to be good at covering even rusty nails without the rust seeping through.

After some thought, I used a stain blocker on the patches, then gessoed over them. The gesso dried more slowly on the patches, and I used a hairdryer on cool setting to speed it up. By about the fourth coat of gesso, the patches were invisible.


This is the recipe I used:

500 milliliters water
45 grams granulated rabbit glue
550 grams whiting

I added the glue to the water and left to soak overnight. Then I heated it in a Pyrex mixing bowl over a pan of boiling water. Once the glue was dissolved, I added the whiting gradually, stirring to get rid of lumps and air bubbles. When the gesso was smooth like thin cream, I applied it to the horse with a flat brush.

You can take it off the heat to use, but stir from time to time and keep putting it back to heat up. It dries fast, and you can sand as necessary between coats, and if it goes well do the whole thing in a day. Six coats is about right, I think. It's a good idea to start with the horse on its side in order to gesso the belly and inside of the legs.

You can see Seraphine's extra carving on her neck and legs.

Sunday 4 November 2018

Seraphine

Seraphine is a G & J Lines (Zaphod was a J & G Lines) dating from the late 19th century. She's named after the dragon in my novel, Trav Zander.

This is Seraphine as I bought her, with no lower jaw and truly depressing beige paint. I carved her a new jaw and ears, and replaced her missing eyes with new glass ones.


I've now cleaned up her brackets, swing irons and bowler hats with emery paper and painted them black, and started varnishing her stand. Since Zaphod's looked so good with four brushed on coats of Rustin's French Polish, I thought I'd do the same with Seraphine's stand. The turned posts were fine after three coats, but the rest of the stand for some reason is not; the finish is uneven, shiny in some places and matt in others after more than ten coats. I can only think it's the type of pine. The posts are a different wood, I'm guessing beech. Hmm.


Saturday 3 November 2018

Zaphod finished


Zaphod is finished at last, and here are his before and after photos. I'm quite proud.


Tuesday 30 October 2018

I've invented the S pin


Well, that was tricky.

I'm beginning to think that restoring a rocking horse properly is a workout for the brain - you come across so many problems you weren't expecting, to which you have to devise solutions.

Today I secured the ends of the swing irons and nailed on the brass bowler hats. I'd bought split pins to go through the holes at the ends of the irons, then realized because of their large heads the bowler hats would not fit on top. (I also had to file down a couple of the ends and washers a smidge for the same reason.) What to do? I cut lengths of wire coat hanger, long so I'd be able to pull on them. I annealed the rods, bent them to an S shape through the holes and cut them to size.

These worked perfectly. Perhaps I could patent them and become a millionaire?

 I used tiny brass tacks to nail on the bowler hats. They were quite stroppy, over-compensating for their small size no doubt.

Zaphod is now finished, hurrah! I haven't yet bolted his hooves to the hoof rail - I'll have to take him home in two trips as my elderly Micra isn't quite large enough to transport him on his stand.


Thursday 25 October 2018

Brass bowler hats

These are used to cover the ends of the swing irons where they poke through the hoof rail. I suspect Zaphod didn't have them originally, as I can't find any screw/tack marks, but split pins and washers look a bit unfinished when the rest of him is all shiny and new.

For some reason, you can only buy brass bowler hats in one size, 45mm. This is too big for a medium size horse - that's the size that Oliver, the extra-large Stevensons Brothers horse I bought for my daughter when she was small has. So, being a jeweller, I made my own 38mm ones from brass sheet. First I milled it down to 0.4mm thick, cut it into squares, annealed them and tapped them into a doming block. I had to anneal them three times. Then I pierced out a circle, polished them, and drilled three holes in each. They aren't perfectly regular, but will look fine.


Tuesday 23 October 2018

Making a rosette

Now this surprised me - I'm good with my hands, and thought making a rosette from ribbon would be a piece of cake. Wrong. Turned out it's really difficult to get it neat, symmetrical and the right size. After a couple of goes I looked on Google for help, but failed to find instructions for the right kind of rosette. Martha Stewart's were particularly vague and unhelpful.

In the end I found instructions on how to sew a flounce, and adapted it by ironing box pleats into a 15mm ribbon (using a slip of 8mm card as a guide), hand sewing the edge and then glueing the ends together. You seal the raw edges to stop them unravelling by carefully running a lighter flame along them. I glued the finished rosette to a leather disc.

It's important to use good quality ribbon. Mine was from John Lewis a decade ago. Cheap ribbon is too soft and loose-woven.


I made six pleats to go with the six petals of the brass florette that goes in the centre. It's nailed on to Zaphod's neckstrap with a domed brass nail. If I'd made him a nailed on bridle, he'd have had a smaller rosette on that to match.

Thursday 18 October 2018

Saddle and sundries

When restoring a rocking horse you have to make hundreds of small decisions along the way as to how you are going to do it. As a jeweller, I'm obsessive about minor details and like to get things right. But sometimes you just can't find a photo of a similar horse in original condition, and you have to plump for one thing or another. The gold fringe, for instance, is possibly more Ayres than J & G Lines - but I couldn't resist the way it looks.

Here are some photos of the process, to show how I made the saddle. I used a staple gun, which was very handy, two types of Bostic and domed upholstery nails. I stitched the saddle on an ordinary sewing machine using a new needle - it only worked if I used the leather forming the underside of the saddle suede side up, as the other side wouldn't feed through the machine. It's stuffed with horse hair which I believe is traditional. I cut the thick leather on a cutting mat with a stanley knife, and used scissors on the soft leather.

The tail strap was surprisingly easy and quick to make. Everything else took ages.

I made paper then fabric patterns of the saddle first

I glued on the velvet saddle cloth, smoothing it out as I went.
The strap, screwed in with three screws, is to hold the stirrup leathers.
The saddle is made of soft leather, stuffed with horsehair and staple gunned to the horse.


These are the saddle flaps, with decorative trim glued on.

The finished (almost) saddle, with decorative rondel.
I still have to shorten the stirrup leathers and put a couple more studs in the saddle flaps.

Saturday 6 October 2018

Zaphod's tack

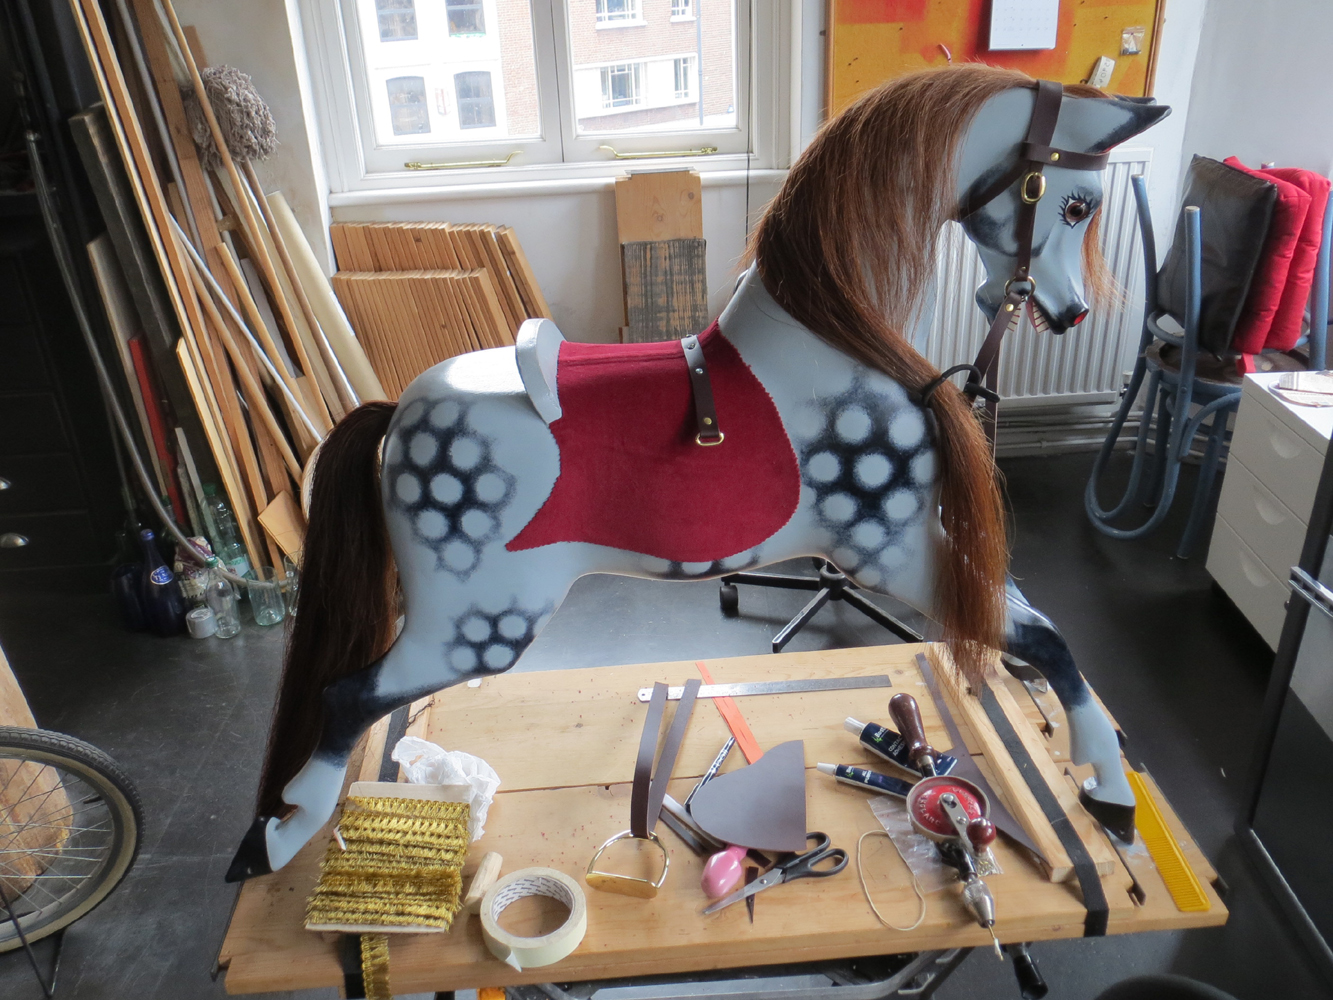
I'm lucky to have a brilliant leather and metal sundries shop near me in Islington, J.T. Batchelor Ltd, in a Victorian building in a narrow mews. I went there to buy leather and buckles for Zaphod's tack. I found this hide in Havana Brown, with matching soft leather for the padded saddle.

I also bought some brass buckles, stud rivets and link pieces.

I've ordered solid brass stirrups from Wirral Rocking Horses. I must say the brown and brass go beautifully together.


Zaphod would have had a nailed on bridle, and perhaps that's what I should have made him - but for now at any rate he has a removable one.


Mane and tail

Zaphod had a brown mane and tail (I know as I found two bits inside his body cavity) so that's the colour I used. These are cured horse tails, which you soak overnight to soften the hide, and cut to size from the hide side with a stanley knife. You then nail the mane to the neck, with a separate bit for the forelock, and allow to dry. The bridle will cover the join. Some horses have a groove so you don't see the hide on the left side - rocking horses' manes traditionally fall to the right - but I didn't carve Zaphod one. I don't know if he would have had a groove originally.


I forgot to mention that I gave Zaphod three coats of satin acrylic varnish. I chose this after some thought rather than an oil-based varnish as it won't go yellow.

Thursday 27 September 2018

Dappling Zaphod


I've started work on Zaphod again. To my shock, I realize it's been ten years nearly to the day since I last worked on him and posted to this blog. What have I been doing? Mostly writing in my spare time rather than rocking horses. Plus the usual life gets in the way stuff.

I've dappled Zaphod, as you can see, and painted his teeth and round his eyes. Dappling is done with black paint and an almost dry stiffish brush, and it's important to hold the pattern in your head and get the fading at the edges right. Being a jeweller, I'm way too perfectionist about this. I'm pleased with how his eyes look. Next step is varnish.

(This is not the tidiest corner of my workshop - note the mousetraps, bottles cut into vases with my new bottle cutter, charging Kindle Fire, 'useful' timber oddments and the offspring's unicycle. I'm decluttering, but haven't reached this bit yet.)

Friday 12 June 2015

Miniature rocking horse

For my daughter's Christmas present, I made her a miniature rocking horse out of scraps of wood. All I bought was a bit of lime wood to carve the head, and the tiny bolts to attach the horse to the rocker - the rest I made from materials kicking round my workshop. I made the stirrups in wax and had them cast in silver. I glued a weight beneath the rocker to make it balance and rock properly. It took rather longer than I expected, and she finally took delivery of it in February.

I started by thinking I'd make it quickly without fussing too much - but of course failed utterly in this endeavour. I'm pleased with how it came out. Here are some photos:


Friday 18 September 2009

Grovelling apology

I have just realized it will be, on the 21st, a whole year since I posted to my blog. I feel really bad about this.

It's not because I've lost interest; it's just that I've been doing other things, mainly writing. Silly, when I've got to the fun stage with Zaphod; dappling, attaching his mane and tail and making a saddle and bridle.

I hope to be back here before too long.

Sunday 21 September 2008

Painting and writing

Sorry to have abandoned the blog. I've been busy in my spare time writing a new novel, called Catch a Falling Star. (The link will take you to a site where you can read the start.) EDIT: now called Remix.

It's about a young woman, called Caz, who is startled to discover a strange man asleep on her roof terrace.

There's a rocking horse connection - my heroine restores and carves rocking horses for a living.

Back to poor, neglected Zaphod. I've given him three coats of paint - two in the wrong colour. For some reason, however careful I was with tests, I kept painting him blue. He's been very patient about it. I do hope I've got it right this time.

Then I can get on to the dappling.

Friday 9 May 2008

A little Ayres!

I'm so excited - I've just bought this little Ayres rocking horse on eBay for £231. It's only 32 inches high, and plain carved, but it's my first Ayres! There are many lovely rocking horses, but Ayres are special; the Rolls Royces of the rocking horse world. This horse is most beautifully and delicately carved; small but perfect. (Click on the photo to see it bigger).

I think perhaps not everyone realized what it was, as Ayres used different, three bolt brackets, different pillars and stands more like Lines for their tiny horses. I looked it up in Patricia Mullins' The Rocking Horse.

You may wonder when I will have time to restore it, given that I've not been able to work on Zaphod lately; but the start of this year was a bit difficult, and I am confident I will get back to my horses soon.

Which will be nice.

Thursday 27 March 2008

Zaphod's first coats of gesso

After a long gap when I've been busy with other things (silver and writing mainly) I'm back working on poor neglected Zaphod.

The photo shows him with his first coats of gesso on. I use Anthony Dew's recipe, except I find I have to add a lot more whiting than he says, else it's way too watery. I don't put on a coat of size first either, as it seems to make the horse wet to no purpose.

It looks good in the picture, but in the daylight on the balcony I saw loads of little dents and gaps that I will have to fill with gesso. Surprising, as I thought I'd done a thorough job of filling and sanding.

The gesso is over the edge of his eyes (now fixed in with filler) and I will clean it off when the gesso layer is complete.

Sunday 13 January 2008

Loose leg joints

Wiggly, but won't come out

So what do you do? Get advice from Tony Jackson is what. He recommends using an offset syringe to inject glue between the surfaces of the joint, drilling a careful hole first.

He doesn't use a needle, but before he told me this I'd bought one from my local chemist. It's not possible to fill the syringe with wood glue through the needle; but if you fill it, then add the needle, the glue will come out all right. This is good, as you can get glue deep into small cracks.

It's a delicate job. I'm sure experience helps, but alas I have none.

Tuesday 8 January 2008

Zaphod's stand finished (almost)

At last...

I cleaned the swing irons, brackets and original bolts with emery paper, and painted them with two coats of Hammerite smooth gloss black paint, as some rust in the crevices was impossible to remove.

The wood that supported the swing irons was very worn, so I made two polished steel plates, and used Unibond Repair Wood for Good filler underneath them. Then I assembled the whole, putting grease on the moving parts.

I had engraved LF andLB (left front, left back) on the swing irons so everything went back to where it came from, including each bracket and their individual bolts.

Tried Zaphod on his stand; he went on perfectly, and doesn't the stand look nice! It seems to rock smoothly, although the irons are quite loose in the brackets.

Saturday 22 December 2007

Friday 21 December 2007

Varnishing the stand

An end to sanding Zaphod's stand!

This is the stand, with four coats of French polish. I like the rich toffee colour.

You can see the stencil has been left unsanded. I now have to strip and paint the swing irons and brackets, then hurrah! it's on to the fun bit, gesso and paint for the horse.

Friday 7 December 2007

Some of my horses...

Reading to rocking horses...

I took this photo (dashing to arrange myself in the ten seconds you get) for publicity purposes. I've entered my novel Trav Zander in the Amazon Breakthrough Novel Award contest, and entrants are able to load a profile.

A sneaky way to have more than one photo in your profile is to post a photo on a book for sale on Amazon.

This is it; me reading Patricia Mullins' The Rocking Horse.

Thursday 22 November 2007

Varnishing the hoof rails

End of the sanding in sight!

I finished sanding the hoof rails and varnished them to make me feel I was getting somewhere. After advice on Rocking Horse Elite's eBay group I decided to use a shellac varnish as this is what would have been on there originally.

I used Rustin's French Polish, but painted it on instead of doing the whole French polishing bit with a rubber and linseed oil. Then I reduced the shine a little with 0000 grade wire wool. The varnish gives the wood a lovely mellow amber colour.


Saturday 10 November 2007

Tum te tum te tum...

Trying to think of something interesting to say about sanding...
The photo shows the left hoof rail, worn down by the feet of Zaphod's riders. It's much more worn than the right rail, as rocking horses, like real ones, are traditionally mounted from the left. It's why rocking horses' manes fall to the right, so they don't get in the way.

I believe most of the wear was done in Zaphod's early years, when he wasn't called Zaphod and had his original head. Children had fewer toys at the end of the nineteenth century, and no television or computers. Any child lucky enough to own a rocking horse probably played with it a lot.

Strange to think of those long-ago Victorian children.

(You can see there's still traces of the red paint. Grrr.)

Tuesday 30 October 2007

Attrition...

Sanding the hoof rails

I have a new plan; I am now spending half an hour each lunch time sanding Zaphod's stand on the balcony. Except when it's raining.

Eventually the job will be done.

You can see in the photo the one I have spent hours sanding. You can also see there's quite a lot of red bits still.

Wednesday 17 October 2007

Gordon Bennett, will it never end?

More Nitromors, wire wool, and sandpaper needed!

Sorry this blog has slowed down. It's the red paint.

I started on the hoof rails at the weekend. The wood is worn by years of use, and glutinous red paint is in every groove and cranny. I shall buy in more supplies (the guy in the local tool shop rubs his hands with glee when he sees me coming) and press on next weekend.

I'm not nearly there yet.

Sunday 7 October 2007

Still sanding...

A long job

Yesterday I spent another few hours sanding Zaphod's stand. As you can see from the photo, there's still a way to go. And I haven't even started the hoof rails.

Naturally, with a hundred and twenty year-old stand, there are plenty of dents, scratches and cracks, all of which are filled with beastly red gloss paint. This has to be removed, though the wood won't end up looking like new - I wouldn't want it to anyway!

You can also see I've been avoiding the stencil, for fear of removing it. I've had plenty of good advice from Rocking Horse Elite's eBay group. The stencils were normally (but not invariably) done in ink rather than paint, which is why the paint stripper did not lift it off. I'm anxious about tackling it; I'm going to leave it till last, then tiptoe up to it with cotton buds, Nitromors and white spirit.

Jackie Darnborough's 'twin' horse has the stencil too.

Monday 24 September 2007

More about the stencil...


From Patricia Mullins' The Rocking Horse;

'Occasionally one finds the stencilled words, "PATENTED JAN 29 1880" on the base of some swing stands, notably those of F H Ayres and G & J Lines. Usually, those who patented an invention...indicated that a product was protected by marking it with the patent number and date. (The patent was for the swing stand, invented by an American, Philip Marqua).

Patent 395 actually became void after only three years when the renewal fee was not paid. In this case any patent marking should have been discontinued after 1883, although, according to the British patent office, it is quite possible that the marking may have been used for some time after that date.

Horses bearing this patent stamp on the stand base should, therefore, date from the 1880s.'

Yes! Zaphod is 120 years old.

Apart from his head.

Saturday 22 September 2007

Stencilled stand

Now this is exciting...

This afternoon I've been stripping Zaphod's stand. Other things I should be doing, but the hell with it.

And to my great excitement, I found under layers of red, crimson and white paint, the stencilled legend PATENTED JAN 29 1880. You can click on the photo to see it better.

There's the same thing in Patricia Mullins The Rocking Horse (the rocking horse bible) on page 92; a horse she dates as 1880s - 1890s.

So Zaphod may be 120 years old. Or three quarters of him is...
* * *
For another example of a J & G Lines with a stencil, take a look at this website: The Rocking Horse Stables.

Monday 17 September 2007

Slow progress...

It's not fair! I need more hours in the day...

I've suddenly got some rush silver commisssions, and can't spare the time to work on Zaphod as much as I'd like. It's frustrating.

I haven't got his leg off yet, either.

I have started stripping the stand, and have removed the entirely pointless two wooden struts nailed on the top rail. Underneath was the original varnish finish, which I hope to be able to replicate in due course, if the wood is reasonably blemish-free.

Saturday 8 September 2007

Zaphod with his saddle-back

Zaphod, complete with his original saddle-back.

Here the horse is, far from finished but at least with all the bits attached that he should have.

I've glued on his right back leg, removed the car filler and put fillets of wood and Rustin's wood filler in the gap. I put the horse on his stand while the glue dried, with bolts through the holes, to make sure he still fits properly on it. (You can guess how I learnt to do this!) The other legs all have movement where they join on to the body, and my next job is to remove them and re-glue them one at a time.

This may be difficult. I'm going to try wiggling them, and if that doesn't work on its own, apply steam to soften the old hide glue.

It's no good leaving them loose, as they may not be strong enough, and any gesso and paint applied would crack.

Tuesday 4 September 2007

Completed slot for the saddle-back

Here is a nice sunny photograph of the finished slot, chiselled out ready to glue the saddle-back into.

Some jobs are harder than you expect, others easier. This, I am pleased to say, was one of the easier jobs.


Monday 3 September 2007

Ed Prytherick

This photo shows how I cut the 60 degree slot in Zaphod's back for the saddle back to fit into; a block cut to the right angle and sellotaped in position as a guide. The horse is roped to the workmate, as I don't have a carver's vice.

I'm proud of it, as it was my own idea, and it worked beautifully. I knew I couldn't saw it accurately freehand.

My woodworking skills are minimal, but such as they are I owe them to Ed Prytherick. He was my best friend long ago at Ravensbourne College of Art, where we were both doing the 3-dimensional design course. It was mostly boys in the class, and they'd all done woodwork and metalwork at school. Ed gave me remedial woodworking lessons for a term or two.

I did not excel as a pupil, but can remember everything he taught me. How to mark out, how to sharpen and adjust a plane blade, how to use a chisel, how to hold a saw. Thanks, Ed.

Wednesday 29 August 2007

Headless no more!

It's nice to see the horse complete with head.

I haven't quite finished carving; the top of the back is still too flat, and I have to saw a slot and glue in the saddle back. Attaching the neck to the body and shaping it was a lot more work than I'd expected, for two reasons.

First, as the top plank of the body was new, I had to carve that, instead of it pointing me in the right direction for the neck.

Then, the wood I used for the muscle blocks was The Wrong Kind of Pine. Don't know what it is, or what it should be, but definitely not this kind. It was like carving plywood, especially when I got to the end grain at the front. It took ages.

Now he is headless no more, I have called the horse Zaphod. A tribute to Douglas Adams' character Zaphod Beeblebrox, who had two heads. Okay, so he had his two heads simultaneously, and this horse has had his heads one at a time; plus this one is his third. But who's counting?

Saturday 25 August 2007

Eye sizes in J & G Lines


*
Just for Mary; pictures of my horse with 18 mm eyes, and with 20 mm.

I shall be painting the larger eyes a brighter brown before I put them in. Of course, once the horse is gessoed and painted, the eyes will look different.

For good measure, I'm putting photos of Jackie's twin horse, and a particularly nice 1890s J & G Lines, which came from either Jane or Jan's website (sorry, forgotten which).